
Projects: The Complete Guide
Projects are how SCREENish organizes tracked time. You create a project, assign it to one or more employees, and then control exactly how each employee is tracked while working on it: which device they track from, whether manual time entries are allowed, weekly hour limits, hourly rates, and monitoring options such as screenshots, program reports, idle time and distraction reporting.
Everything happens in one place: the PROJECT menu of your employer dashboard, which has two tabs — Create / Edit Your Projects and Assign Projects to Employee(s). This guide walks through both tabs and every option on them. Along the way it links to a short, focused guide about each option; every link opens in a new tab, so you never lose your place here.
Creating and editing projects
In the Create / Edit Your Projects tab, click Create New Project. The project appears in the list right away, named "New Project" — click its name to type the real one, and click the description to replace the placeholder text. Both fields are edited inline: Save confirms, Cancel discards. Use the Find in projects box to filter a long list.
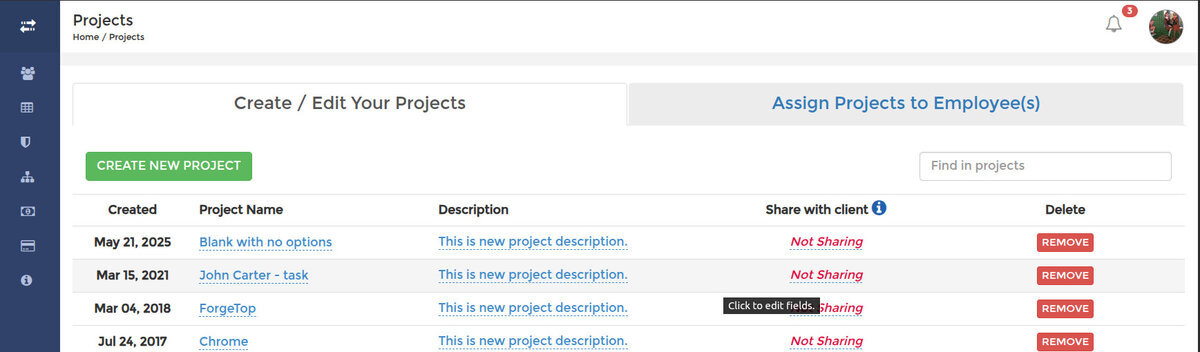
To delete a project, click Remove in its row and confirm. The project stops being available to every employee it was assigned to, and each of them is notified by email.
Read more: Creating and Deleting Projects, Renaming a Project, Adding a Project Description.
Sharing a project with a client
The Share with client column gives a client read-only access to the work logs of the employees working on that project — and on that project only. Click Not Sharing, enter the client's email and confirm: they receive a link and a time-limited password, no SCREENish account needed. You can resend the invitation at any time, or click Make Private to revoke the access again.
Read more: Sharing Project Progress with Clients, and for exactly what the client can and cannot see, Client Sharing: What Your Client Can See.
Assigning a project to an employee
Switch to the Assign Projects to Employee(s) tab. Every active employee has a row, and the Assigned Projects column shows their projects as colored pills. Click the green + button and pick a project from the list — a search box appears when you have more than ten projects, and projects the employee already has are grayed out. The assignment is instant: the employee is notified by email, and the project shows up in their time tracking application the next time they log in to it.
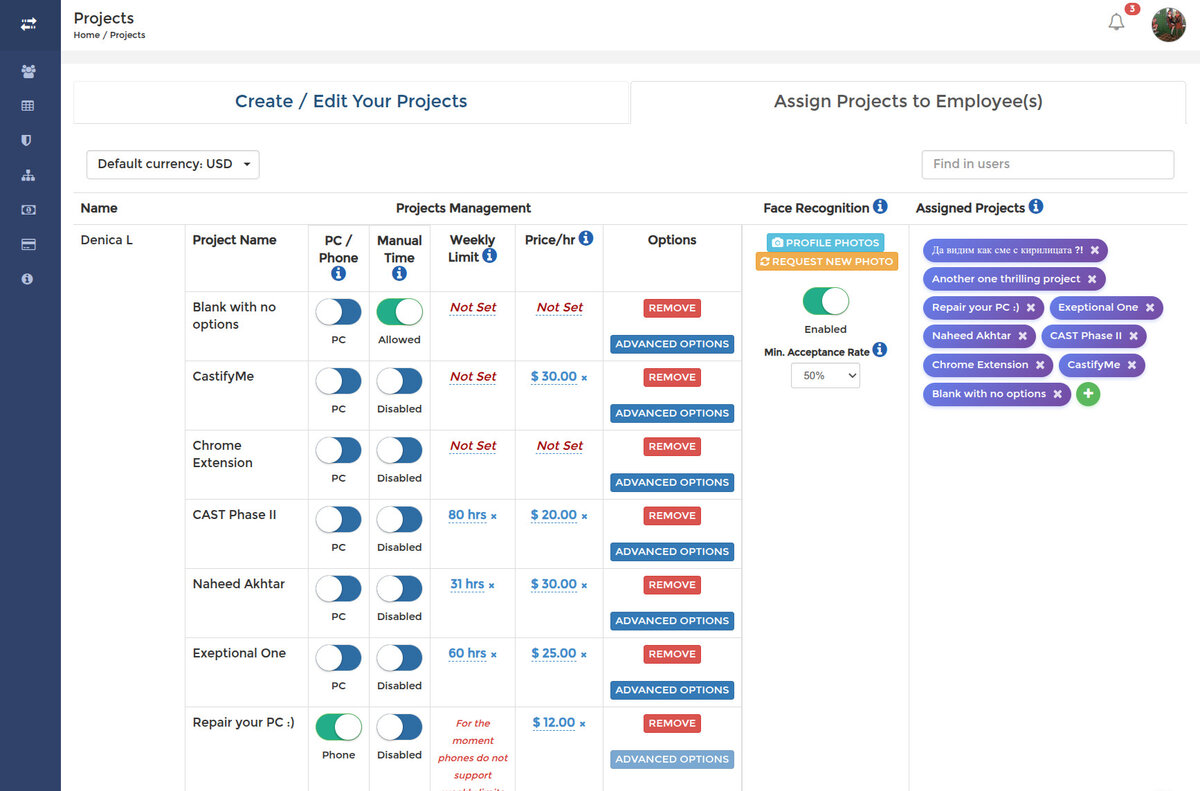
To unassign, click the × on the project's pill (or the Remove button in the project's row in the middle column) and confirm. The employee is notified by email.
Read more: Assigning a Project to an Employee, Removing a Project from an Employee.
Settings for each assignment
The middle column, Projects Management, lists each employee's assigned projects together with per-assignment settings. They apply to that employee on that project, so two employees on the same project can have completely different setups.
- PC / Phone — choose whether this project is tracked from the desktop application or from the phone. Each project uses one or the other, never both. Read more: Choosing PC or Phone Tracking for a Project.
- Manual Time — let the employee add time entries by hand, on top of tracked time. Manual entries are highlighted in red in Accounting so they are never mistaken for tracked hours. Read more: Enabling Manual Time Entry.
- Weekly Limit — cap how many hours the employee can track on this project per week (PC tracking only). Read more: Setting Weekly Time Limits.
- Price/hr — set an hourly rate so payroll is calculated automatically, shown in your default currency. Read more: Setting Employee Hourly Rates, Changing Hourly Rates Retroactively, Setting Your Default Currency.
Advanced Options: monitoring, privacy and distraction rules
Each assigned project row also has an Advanced Options button (PC tracking only). It opens a panel where you decide what the time tracking application records for that employee on that project:
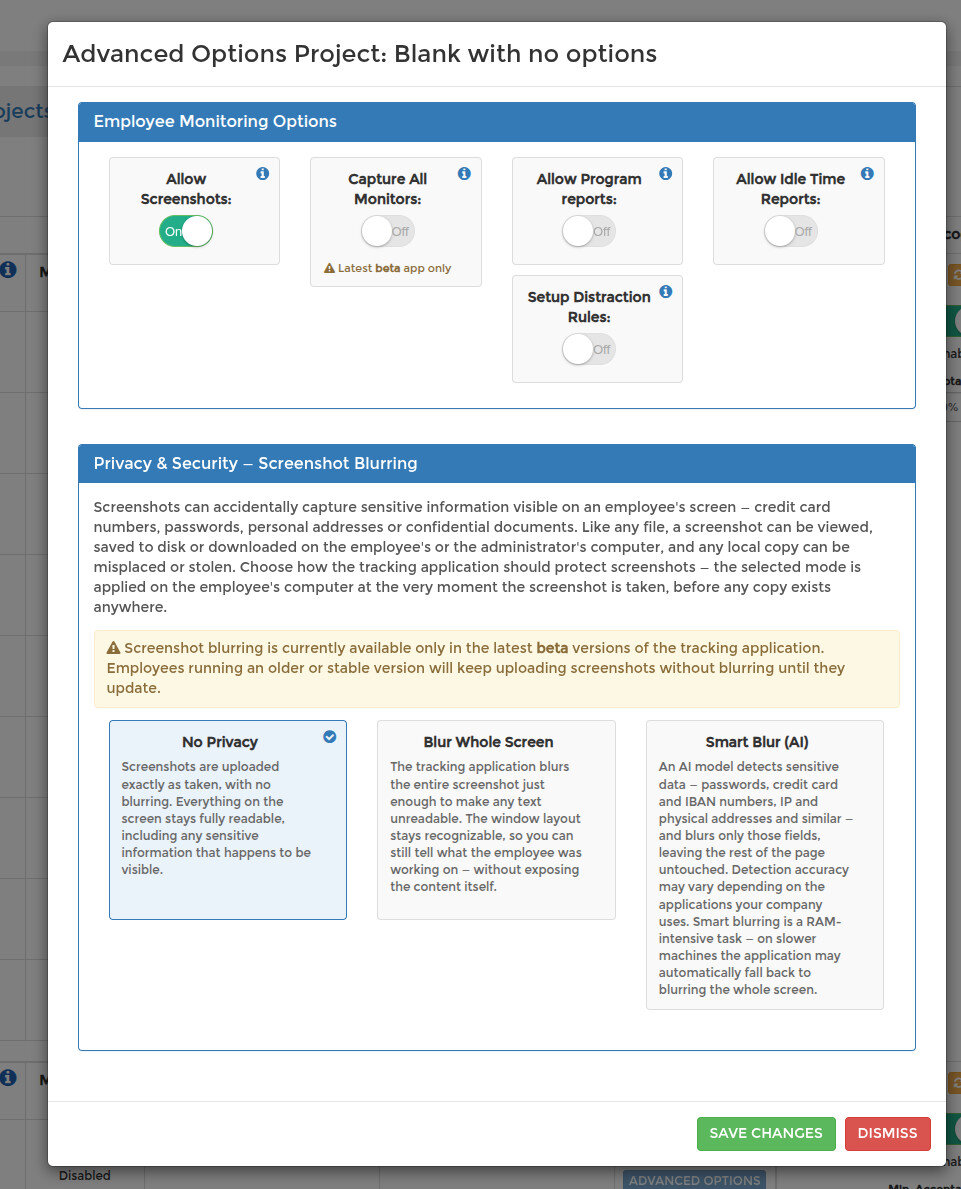
- Allow Screenshots — take a screenshot every 10 minutes while the employee tracks time. On by default; turn it off for time-only tracking.
- Capture All Monitors — capture every connected monitor in one screenshot instead of the single monitor the employee picked. Read more: Screenshots: Capturing All Monitors.
- Screenshot Blurring — blur the whole screen, or let AI blur only sensitive data such as passwords and card numbers, before the screenshot ever leaves the employee's computer. Read more: Screenshots: Choosing a Privacy Blur Mode, Screenshots: When Smart Blur Blurs the Whole Screen.
- Allow Program Reports — record which programs and window titles were used while working. Read more: Using Active Programs Reports.
- Allow Idle Time Reports — report when the employee is inactive while the tracker runs. Read more: Using the Idle Time Feature.
- Setup Distraction Rules — alert the employee when they open sites or programs you have marked as distractions. Read more: Using the Prevent Distractions Feature, Setting Up Distraction Rules.
For an overview of the whole panel, see Project Monitoring Options: Screenshots, Programs and Idle Time. Capture All Monitors and Screenshot Blurring need the current version of the tracking application — see Downloading the SCREENish App.
Face recognition
The Face Recognition column on the same tab lets you verify that the person tracking time is really your employee. It is strictly consent-based and needs an approved profile photo before it can be switched on. Read more: Face Recognition: How It Works, Face Recognition: Enabling It for an Employee.
After you change anything
Changes to assignments and advanced options reach the time tracking application when it logs in, not while it is running — ask the employee to log out of the application and back in, or restart it. The dashboard reminds you of this after every change. Details: Project Monitoring Options: When Setting Changes Take Effect.